
Telephone Number Auto Attendant Set Up
Every phone call matters. Give your customers a great first impression by how they reach you - getting to the right person, the first time. This self-serve menu greets callers via a voice-based menu system, allowing callers to bypass a traditional phone system operator or front desk. Auto attendants are available for each of your office phone numbers being used.
The Auto Attendant consists of a main menu and up to eight distinct Keypress menu options. This can be used to direct the inbound call traffic from your main telephone number (such as press 1 for the Directory, press 2 for Sales, press 3 for Customer Service). You can then simply point the option to go to the specific extension.
Before you can set up the menu options, you will need to first ensure that all of your extensions are set up for call handling as desired. For example, if you want one of your menu options to point to a virtual extension used for queue or call group routing, ensure this has already been set up.
Check out the Video Tutorial here or below for written instructions:
In your NEWTCF PBX Instance, navigate to the TN Tab. In this screen, navigate to the Telephone Number line item you want to use for the main menu set up (typically this is the main phone number used when customers first call in to your company). Note that you can set up auto attendants for one or more of the telephone numbers on your PBX.
Clicking on the Pencil Icon at the end of the row will guide you into the details screen of that Telephone Number. The call flow tab is where you will complete your menu set up.
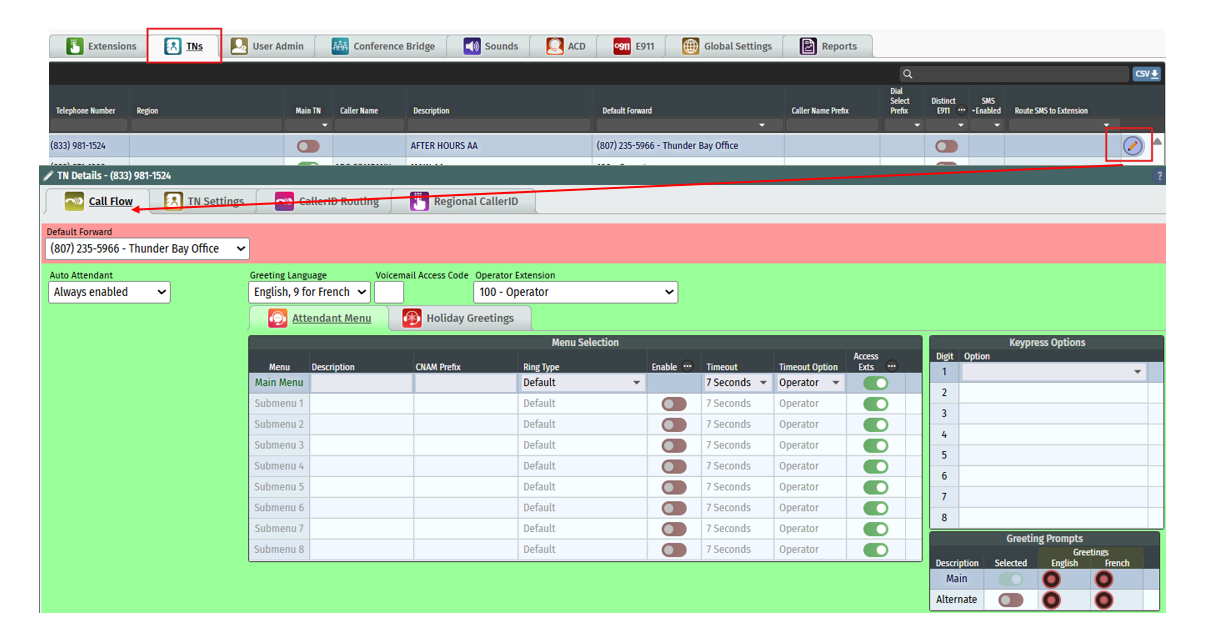
Default Forward
Default allows you to route the calls that come into this number, to an extension right away. This is often used for “LIVE ANSWER” to a front desk extension, but can also be used to send calls to another phone number. You'll notice the default forward section is Green, for this set up.
Once you turn on the Auto Attendant on, the Default Forward is used for different purposes, based on the AA setting you choose. For instance:
If the Auto Attendant is set to "Always Enabled", the AA is on all the time. So the default forward will only kick in, if the PBX is down for any reason, your internet is down or power outages etc. You'll notice the default forward section is Red, for this set up.
If the Auto Attendant is set to "Enabled On", the AA only works during the scheduled dates/times you've set up. The Default forward will then kick in, outside of the scheduled hours. You'll notice the default forward section is orange, for this set up.
For these reasons, it's important to set your default forward as your first step!
Auto Attendant Options
To turn on the auto-attendant, select the appropriate option from the drop-down menu.
Always Enabled: This enables the Automated Attendant to be on 24/7.
Enabled on… : This enables the Automated Attendant on a scheduled basis. Additional scheduling options (day and times) will appear once this is selected, allowing the operator to answer phones live during some times/days, and not others (when calls will then default forward to your chosen extension). *Ensure you also set the default forward so that the calls are directed to go somewhere outside of the scheduled hours.
The Greeting Language will default to English with an option for customers to press 9 for French.
The Operator Extension can be set to whichever extension you'd like. If a customer presses 0 or times out, this is the extension the call will go to.
Inside the Attendant Menu, set the following options:
Timeout - This is the amount of time, in seconds, that the Auto Attendant will wait for the caller to choose a menu item selection before proceeding to the Timeout Option.
Timeout Option - The default selection if the user fails to make a menu item choice within the allotted Timeout period. This may be set to ring an Operator for instance.
Access Exts - By default, this is toggled on so the Auto Attendant will be able to pass calls through to Extensions. These should not be turned off.

Setting the Menu Options
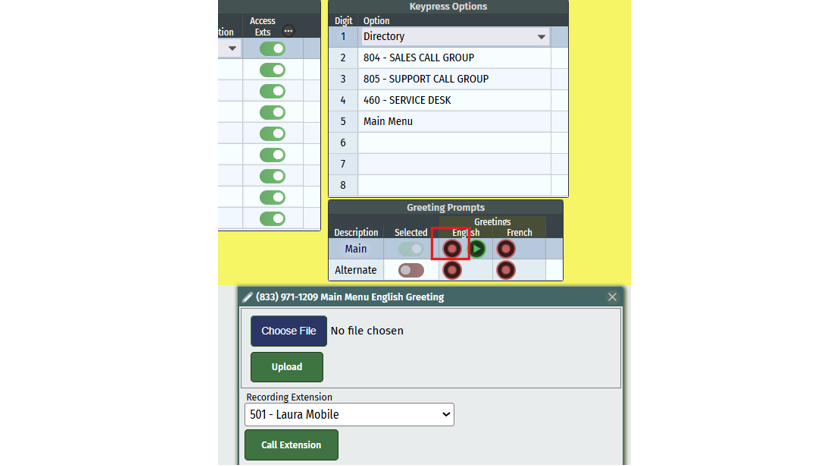
The Kepress Options area is where you will set up the calls route to, when a caller presses a "menu" number on their phone(for example, in the below picture, the caller presses 2, the call will be sent to ext 807 - the training call group).
Navigate to the Keypress Options section. For Digit 1 (caller presses 1) select the option to send the call to (either a virtual extension previously set up for the basic queue or a ring group, or to the directory, or to a conference bridge, or a single user’s extension etc.).
For options you are creating that will have a submenu, leave the digit # option blank for now – skip it to reserve it (see below submenu set up).
Continue adding Keypress Options for the main menu as desired. Once done, please hit the save button before continuing.

Submenu’s
If you are adding submenu’s (for instance, the caller presses 1 for sales and is then asked to press 1 for residential sales or 2 for commercial sales), follow the below steps:
Navigate to the Menu item called Submenu 1. Add a description (such as “sales”) and then toggle on the “enabled” button. The system will now ask you to update – please hit the SAVE button before continuing.
Then, within the Submenu, navigate to the Keypress Options section and select the extensions for each submenu keypress option – please hit the SAVE button before continuing.
Then navigate back to the Main Menu line item. In the Keypress options there – you can now select the submenu you just created; in the keypress option you left blank earlier.

Once your menu set up is complete, ensure you save your work. Then proceed to set up your greetings.
Greeting Prompts
Now it’s time to set up the greeting for the menu, to instruct the caller what option to press, to get to where they want to go. Please ensure your recording, matches the KeyPress Digit #'s correctly!
When you click on the red button to record the Automated Attendant Menu Instructions, the following will display:
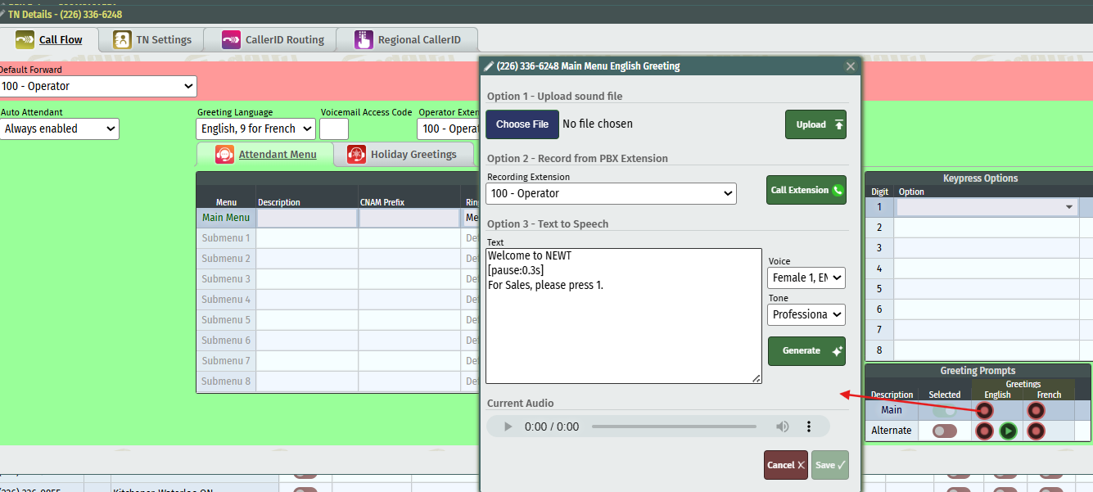
To record the prompts manually:
Select the extension of the phone you want to use for recording, under the Recording Extension Section.
Click on Call Extension.
Pick up the receiver and follow the attendant’s prompts to record the company greeting. You may want to have a script ready to welcome the caller and instruct them to “press 1 for sales, press 2 for the company directory” etc…based on the menu you have set up above.
Once recorded, stay on the phone for further instructions on how to listen to the greeting again and how to save it.
To upload a previously recorded sound file:
Click on Choose File and select the file from your computer.
Click on the Upload Button.
To use Text to Speech:
Simply type in your text, choose the voice and language to use, then choose professional or casual tone and then hit the Generate button.
You can listen to the audio it generates once rendered. You can make corrections to text or change the voice options and hit regenerate.
Once you are satisfied with the recording, click the save button to save the script and the recording. Ensure you save and update the main screen for publishing.
If you have a submenu: click on the submenu line to reveal the greeting prompt option for the submenu and repeat this process.
Once done, please save and then hit the Save and Update button on the main screen, to publish ("go live").
Click Below for Additional Articles related to Telephone Number Set Up Features:
Related Articles
Telephone Number Main Settings
How to Update Telephone Settings: For NEWTCF Administrators
Extension Main Settings
How to Update Extension Setting : For NEWTCF Administrators
Extension Call Flow Handling Set Up
How to set up Extension Call Flows: For NEWTCF Administrators
Extension Detail Settings
How to Update Details within the Extension Screen
Text to Speech Recording Feature
Recording your AA menu, VM or ACD announcements
Telephone Number - Detail TN Settings
How to update Ring Tones and DISA settings