
ACD ADMIN - Call Flow Set Up for QUEUES
Once your Queue’s within the ACD have been created, NEWT will assist with the set up to route the calls into the queue, from the Telephone Number you wish to use.
However, this article explains the set up, in the event you wish to make changes.
Virtual Extension Set up
Virtual extensions in your PBX are short, internal routing numbers not tied to any physical hardware. These are primarily used to seamlessly route calls from your Automated Attendant.
A virtual extension needs to be set up for each queue, to add as AA menu options and route calls to the queue.
From the PBX Main Screen, in your Extension Tabl listing:
Select an unused virtual extension and rename it to suit the purpose (such as ACD - Sales Queue). Note that if you need additional virtual extensions, please contact your NEWT provider to have it added.
Click on the Pencil Edit Icon at the end of the row to edit the virtual extension.

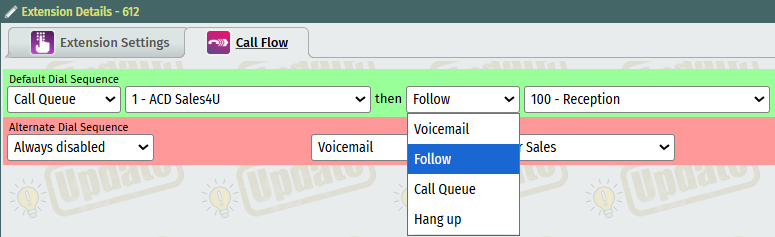
In the Call Flow tab, select the Default Dial Sequence "Call Queue" as the first step, and select the ACD queue from the drop-down menu (this only shows up after the queues have been created on the ACD).
"Then" is the second step for you to tell the call where to go, if no one is logged into the queue, or if the call hits the "queue time out" threshold. You can tell the call to go to voicemail or another queue or follow another auto attendant or (if turned on), use the automated queue call back function (see below).
Ensure you click Save, when done, and then repeat this process for ALL QUEUES on your ACD.
When done, click on the Save and Update button on the main screen, to publish to your PBX.
You can now add these virtual queues to your Auto Attendant as key press options to route calls to the various queues. Please visit the Telephone Number Auto Attendant Set Up tutorial for further instructions.
Time of Day and After Hours Set ups per queue:
Although the Auto Attendant you are using for queue routing has time of day scheduling settings for you to utilize, their may be scenario's where you want to leave the Auto Attendant on all the time and instead, program each virtual extension with it's own time of day scheduling, while routing calls elsewhere after hours. An example of this would be sales is on queue from 9-5 and you want to send callers to a voicemail box after hours. But customer service is on queue from 7am - 10pm and you want to send callers to an On Call emergency number after hours.
In these scenario's, it's best to use time and day scheduling within each of the virtual queues with some unique call flow options for each one.
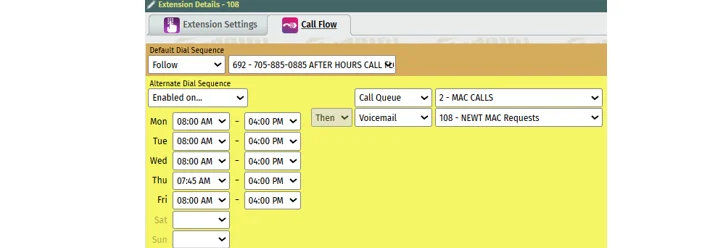
In the Call Flow tab, select the Alternative Dial Sequence – " Enabled On"
Set the Days and Times of work hours for this queue.
Once done, Go up to the Default Dial Sequence at the top of the screen (now in orange) to “follow” and tell the calls where to go AFTER HOURS.
Ensure you click Save, when done, and then repeat this process for ALL QUEUES on your ACD.
When done, click on the Save and Update button on the main screen, to publish to your PBX.
You can now add these virtual queues to your Auto Attendant as key press options to route calls to the various queues. Please visit the Telephone Number Auto Attendant Set Up tutorial for further instructions.
ACD Queue Call Back feature:
While customers can already choose to have an agent call them back instead of waiting in the queue, this new feature allows you to set up an automatic call back using a new “Queue Callback” call flow option.
HOW DOES IT WORK
Each of your queues is set by standard so that calls “time out” (the call will no longer be held in queue for the next available agent). Once the queue timeout is reached, the virtual extension will proceed to the next step which you can now set to automatically go to the call back function.
What this will do, is trigger the call back to happen, from the queue you’ve set it to go to, for an agent call back.
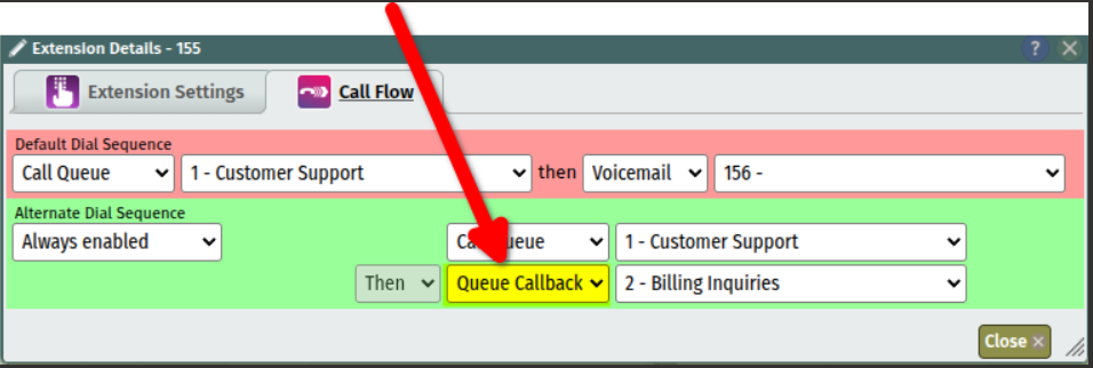
Please note that the Queue must have Call Backs feature turned on by NEWT staff, before the queue call back option will be seen in the Extension Call Flow drop-down menu on your PBX.
To understand how the agent call back function works for agents:
If a customer chooses the call back function while holding in queue – as soon as an agent becomes available, their phone will simply ring as if it’s a new inbound. When the agent picks it up, the system will attempt to call the customer on the number they provided when they set up the call back.
Likewise, the agent will now experience the same thing, if the automatic "queue call back" is triggered.
Related Articles
NEWT ACD Call Insights
Call Insights and Transcripts
ADC Admin - Supervisor Access for Monitoring
How to give access to users for ACD Monitoring and Reporting
ACD Admin - Agent Console Access Set Up
Providing User Access to the ACD Agent Console
ACD Admin - TN Settings
Administering your NEWT PBX Automatic Call Distribution
ACD Admin - Work States Settings
Administering your NEWT PBX Automatic Call Distribution
ACD Admin - Dispositions Settings
Administering your NEWT PBX Automatic Call Distribution