
ACD Admin - Announcements Settings
Each queue can support media that will play to queued callers. In addition to the preloaded music on hold, estimated wait times and position in queue assignments, one can further customize each queue with additional announcements. Adding announcements for your queues, that customers will listen to, based on the queue announcements set up as per above, is quite simple. To add an announcement record, click on the button. You’ll notice a new line item is automatically added.
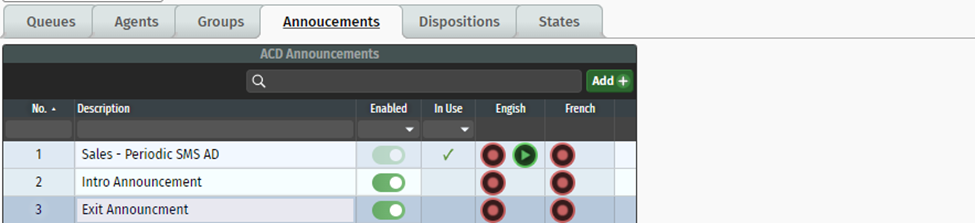
No. – This number is automatically assigned per announcement recording that you add.
Description – Add your desired description to identify which recording this is for.
Enabled – Toggle this on or off to enable the recording to be seen in the queue listing as an option in the dropdown menu.
In Use – this is a filtering column to indicate the recording is currently being utilized in queues for customers to listen to.
Creating Recordings for ACD Announcements
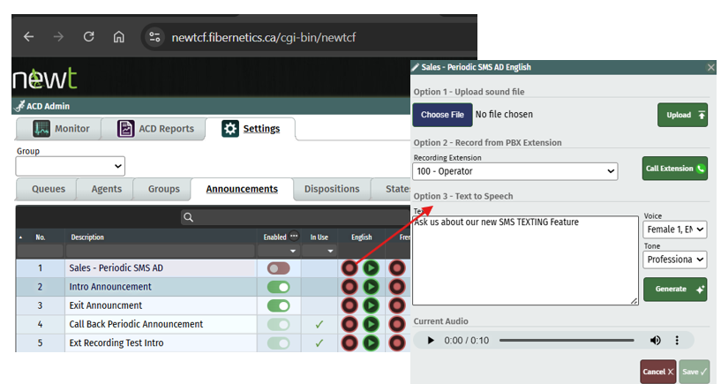
In the English or French column – here is where you simply click the red button, to record or upload an audio file. When you click the button, a new window will appear. Choose from 1 of the 3 available options:
To record the announcement manually:
Select the extension of the phone you want to use for recording, under the Recording Extension Section.
Click on Call Extension.
Pick up the receiver and follow the attendant’s prompts to record the company greeting. You may want to have a script ready to welcome the caller and instruct them to “press 1 for sales, press 2 for the company directory” etc…based on the menu you have set up above.
Once recorded, stay on the phone for further instructions on how to listen to the greeting again and how to save it.
To upload a previously recorded sound file:
Click on Choose File and select the file from your computer.
Click on the Upload Button.
To use Text to Speech:
Simply type in your text, choose the voice and language to use, then choose professional or casual tone and then hit the Generate button.
You can listen to the audio it generates once rendered. You can make corrections to text or change the voice options and hit regenerate.
Once you are satisfied with the recording, click the save button to save the script and the recording. Ensure you save and update the main screen for publishing.
TIPS when using TEXT TO SPEECH products:
Use a period to end a sentence.
For items like email addresses, use spaces and literal punctuation (i.e., “newt.ca”, instead of “newt dot c a”).
For pauses, try [pause:1.5s] or hitting enter to leave some blank lines in between sentences.
We understand that LLM’s are not always perfect. It tries its best, but that doesn’t mean you won’t find the occasional error in the recording rendered. You may need to regenerate a couple of times for best results.
Related Articles
ACD ADMIN - Call Flow Set Up for QUEUES
Setting up your Call Flow for Queue Routing
NEWT ACD Call Insights
Call Insights and Transcripts
ADC Admin - Supervisor Access for Monitoring
How to give access to users for ACD Monitoring and Reporting
ACD Admin - Agent Console Access Set Up
Providing User Access to the ACD Agent Console
ACD Admin - TN Settings
Administering your NEWT PBX Automatic Call Distribution
ACD Admin - Work States Settings
Administering your NEWT PBX Automatic Call Distribution
ACD Admin - Dispositions Settings
Administering your NEWT PBX Automatic Call Distribution